11. Implementing New Hardware Devices with Rattlesnake
WARNING: This chapter contains advanced Rattlesnake operations that require a reasonably good understanding of the Rattlesnake software architecture. Understanding this chapter is not required to run the software successfully, and therefore this chapter can be skipped if the user is not interested in implementing a new hardware device.
Rattlesnake allows users to implement new hardware devices with minimal modifications to the controller. Within the GitHub repository, there is a source file components/abstract_hardware.py that defines abstract base classes HardwareAcquisition and HardwareOutput. All hardware devices used by Rattlesnake must implement acquisition and output classes that inherit from these abstract base classes and define functions that overwrite the abstract methods in these base classes. The acquisition and output will generally be run on separate processes in Rattlesnake to ensure that output can be streamed to the device as acquired data is simultaneously read from the device. A flowchart of the operations performed by each hardware process is shown in Figure 11-1.
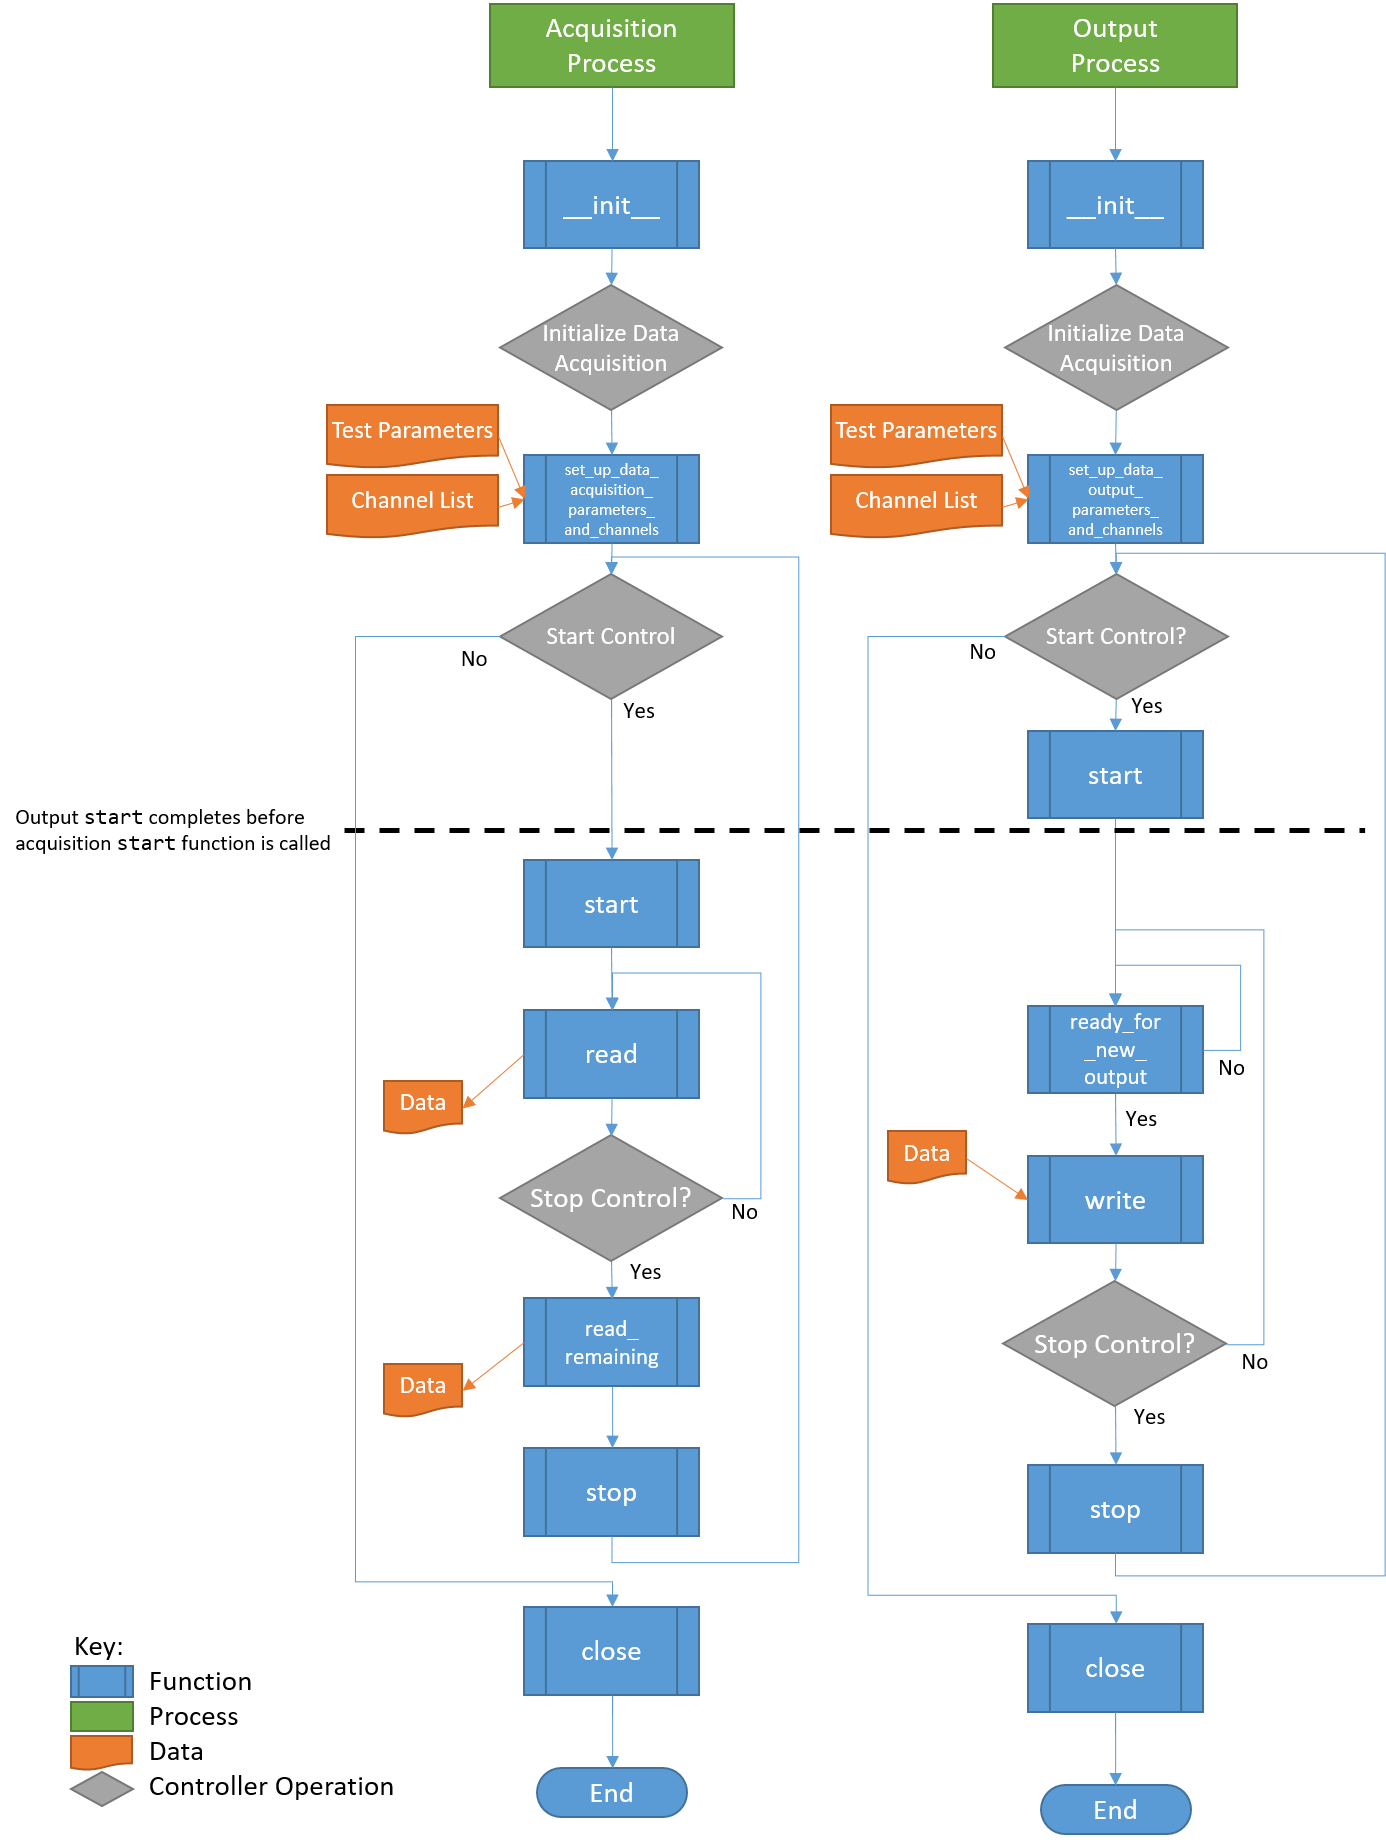
Figure 11-1. Flowchart of Hardware Operations. Note that each process will proceed at its own pace, so it is generally not possible to ensure that an Acquisition function is called before or after an Output function. The only place where order of operations is enforced is at startup, where the Output start function finishes before the Acquisition start function is called.
The hardware setup in Rattlesnake generally assumes that separate processes are required for acquisition and output. However, this may not be the case for all hardware devices. If a device can only run on a single process, users can utilize a multiprocessing queue to pass the output data from the output process to the acquisition process and perform all hardware processes there. See, for example, the hardware implementation in components/state_space_virtual_hardware.py for more details on this approach; the excitation signal is obtained by the write method and immediately passed to a queue to deliver to the acquisition process.
Users implementing new hardware devices are encouraged to look at existing hardware implementations in the GitHub repository (components/nidaqmx_hardware_multitask.py, components/lanxi_hardware.py, components/data_physics_hardware.py,
components/state_space_virtual_hardware.py,
components/sdynpy_system_virtual_hardware.py, and components/exodus_modal_solution_hardware.py) to use as examples.
11.1. Defining a HardwareAcquisition Class
The acquisition portion of the data acquisition hardware is defined using a class that inherits the abstract base class HardwareAcquisition in components/abstract_hardware.py. A class inheriting from HardwareAcquisition must implement the following functions.
- __init__ The class constructor that initializes the hardware device. Here default parameters can be set up.
- set_up_data_acquisition_parameters_and_channels This function is called when the
Data Acquisition Setuptab is initialized. This function will nominally set up the channels on the hardware as well as any other acquisition parameters such as sample rate or triggering that are required by the hardware. As arguments, this function receives an object defining the data acquisition parameters as well as a list of channels. Note that some hardware devices require separate setup for output and acquisition, while others may only need to be set up once for both hardware and acquisition. For the latter case, users should evaluate whether or not it makes sense to do the setup in theHardwareAcquisitionorHardwareOutputclass. Note also that there is no assurance made by the controller that operations in theset_up_data_acquisition_parameters_and_channelsfunction will be called before or after operations in the theset_up_data_output_parameters_and_channelsfunction from theHardwareOutputclass, as they will both be called simultaneously by separate processes. If a specific order of operations for hardware setup must be enforced, those operations should be contained entirely in either theset_up_data_acquisition_parameters_and_channelsfunction or theset_up_data_output_parameters_and_channelsfunction from theHardwareOutputclass. - start This function is called when the acquisition system starts acquiring and should start the device recording. This function will always be called after the
startfunction from theHardwareOutputclass, so users can rely on that ordering for order of operations. - read This function reads a set of data from the device. The returned data should be a Numpy array with number of rows equal to the number of measurement channels and number of columns equal to the number of samples read. The number of samples read is determined by the
Sample RateandTime per Readparameters that get specified on theData Acquisition Setuptab. - read_remaining This function reads the remaining data on the device, as it is called before the device is stopped. It returns a Numpy array with number of rows equal to the number of measurement channels and a number of columns equal to the number of samples remaining to be read on the device.
- get_acquisition_delay This function returns an integer number of samples that defines how much longer the acquisition should acquire after output shuts down. This is designed to accommodate any output buffering present in the hardware device.
- stop This function is called when the acquisition system should stop recording, so it should stop any data acquisition on the device. The controller makes no guarantee that the
HardwareAcquisitionstopfunction will be called before or after theHardwareOutputstopfunction, so the user should not rely on one stopping prior to the other. - close This function is called when the controller is shutting down the hardware for good. It should gracefully shut down the hardware and release any memory or references related to it. The controller makes no guarantee that the
HardwareAcquisitionclosefunction will be called before or after theHardwareOutputclosefunction, so the user should not rely on one stopping prior to the other.
11.2. Defining a HardwareOuput Class
The acquisition portion of the data acquisition hardware is defined using a class that inherits the abstract base class HardwareOutput in components/abstract_hardware.py. A class inheriting from HardwareOutput must implement the following functions.
- __init__ The class constructor that initializes the hardware device. Here default parameters can be set up.
- set_up_data_output_parameters_and_channels This function is called when the
Data Acquisition Setuptab is initialized. This function will nominally set up the channels on the hardware as well as any other output parameters such as sample rate or triggering that are required by the hardware. As arguments, this function receives an object defining the data acquisition parameters as well as a list of channels. Note that some hardware devices require separate setup for output and acquisition, while others may only need to be set up once for both hardware and acquisition. For the latter case, users should evaluate whether or not it makes sense to do the setup in theHardwareAcquisitionorHardwareOutputclass. Note also that there is no assurance made by the controller that operations in theHardwareAcquisitionset_up_data_acquisition_parameters_and_channelsfunction will be called before or after operations in the theset_up_data_output_parameters_and_channelsfunction from theHardwareOutputclass, as they will both be called simultaneously by separate processes. If a specific order of operations for hardware setup must be enforced, those operations should be contained entirely in either theset_up_data_acquisition_parameters_and_channelsfunction from theHardwareAcquisitionclass or theset_up_data_output_parameters_and_channelsfunction from theHardwareOutputclass. - start This function is called when the acquisition system starts acquiring and should start the device outputting signals. This function will always be called before the
startfunction from theHardwareAcquisitionclass, so users can rely on that ordering for order of operations. - ready_for_next_output This function is called prior to writing any data to the hardware to check whether or not the device is ready for new outputs. This function will return
Trueif the device should accept new output signals, andFalseif it should not. If the controller was able to write data to the hardware as fast as possible, it might fill up the hardware buffer. This would make the controller very unresponsive as the buffer would need to be exhausted by outputting all stored samples prior to any new data being output. In general, the function should be set up such that the minimum amount of data is stored on the device (i.e. written to the device but not yet output) at any given time, while also ensuring that variations in the controller's performance due to other tasks being performed simultaneously do not result in the buffer running out of samples to output before the next set of samples is written to the device. Generally a buffer of two or three writes worth of samples is sufficient to ensure that the buffer does not exhaust itself. - write This function accepts data as a Numpy array and writes it to the hardware. The array will be sized such that the number of rows is equal to the number of output signals and the number of columns is equal to the number of samples that are written per channel, which is determined by the
Sample RateandTime per Writeparameters that get specified on theData Acquisition Setuptab. - stop This function is called when the acquisition system should stop outputting data, so it should stop any data output on the device. The controller makes no guarantee that the
HardwareAcquisitionstopfunction will be called before or after theHardwareOutputstopfunction, so the user should not rely on one stopping prior to the other. - close This function is called when the controller is shutting down the hardware for good. It should gracefully shut down the hardware and release any memory or references related to it. The controller makes no guarantee that the
HardwareAcquisitionclosefunction will be called before or after theHardwareOutputclosefunction, so the user should not rely on one shutting down prior to the other.
11.3. Controller Modifications to Recognize New Hardware Devices
With the new hardware device implemented, the controller should be modified to find the new hardware device and allow the user to run it.
11.3.1. Graphical user interface (GUI) Modifications
In order for the user to select the newly-implemented hardware device, the hardware must be added to the Hardware Selector drop-down menu on the Data Acquisition Setup tab of the controller. This requires editing the components/combined_environments_controller.ui file. Editing of *.ui files is most easily done through the Qt Designer software, but can also be done by editing the *.ui file directly, as it contains XML. The widget that needs to be modified is a QComboBox widget with the name hardware_selector. An additional item needs to be added to the widget corresponding to the hardware device.
If the hardware requires additional user parameters to be specified, then further modifications to the GUI might be required. Such modifications will require a thorough understanding of the Rattlesnake source code. These modifications will be highly specific to the hardware being implemented, and are therefore out of scope for this User's Manual. Such modifications might include adding a dropdown to select a trigger channel to synchronize acquisition and output or adding integration parameters such as minimum or maximum timestep for a virtual hardware device that utilizes a nonlinear integrator.
11.3.2. Modifications to the User interface (UI) Callback Functions
With the GUI modified to enable selecting the hardware interface, the user might need to modify the Hardware Selector callback function in order to ensure the proper options are visible to the user. These callbacks are defined in the components/user_interface.py file in the Ui class. The hardware_update function may need to be modified to handle hiding or showing specific widgets when the new hardware device is selected.
If the hardware interface requires additional user parameters to be specified, then further modifications to the code will be required. These modifications will be highly specific to the hardware being implemented, so this User's Manual will only discuss where the changes will need to be made, but not necessarily what those changes need to be. If additional parameters are required, users may need to modify the DataAcquisitionParameters class found in components/utilities.py to add these additional parameters to the global parameter set. The user will also need to modify the code where the class is instantiated to include these new parameters, particularly in the initialize_data_acquisition function of the Ui class in components/user_interface.py.
11.3.3. Modifications to the Acquisition and Output Processes
Finally, the initialize_data_acquisition functions in both the AcquisitionProcess class in components/acquisition.py and the OutputProcess class in components/output.py will need to be modified to correctly initialize the hardware. A new elif statement should be added to the main if statement inside that function to accommodate the new hardware device index that was added to the Hardware Selector dropdown menu. The *.py file that contains the hardware implementation should be imported and the respective Acquisition or Output class should be instantiated. It is at this point that any additional arguments to the classes' __init__ functions are passed. The object instantiated from the class should be stored to the self.hardware property of the class.